
<?php if (!defined('__TYPECHO_ROOT_DIR__')) exit; ?>
<?php
//TODO:先使用PHP定义变量实现,后期使用自定义主题实现
$x=2;
/**
* archive2
* @package custom
*/
Typecho_Widget::widget('Widget_Stat')->to($stat);
?>
<?php $this->need('header.php'); ?>
<div id="content">
<section class="post">
<span class="archive-move-on"></span>
<?php
$all=($stat->publishedPostsNum);
//页数=向上取整(总归档数/每页文章数);
$pages=ceil($all/$x);
//echo '<p>'.$pages.'</p>';
$this->widget('Widget_Contents_Post_Recent',
'pageSize=10000')->to($archives);
//$year=0; $mon=0; $i=0; $j=0;
$output = '<span class="archive-page-counter">
<h2>目前共计 '.$stat->publishedPostsNum.' 篇日志。</h2><ul></span>';
$count=0;
$i=1;
while($archives->next()):
if($count%$x==0) {
if($count==0) {
$output.='<div id="archive page '.$i.'" class="archive" >';
} else if($count!=0) {
$output.='</div>';
$output.='<div id="archive page '.$i.'" c
lass="archive" style="display:none;">';
}
$i++;
}
$output .='<li><time class="post-time" itemprop="dateCreated"
content="'.date('Y-m-d',
$archives->created).'">'
.date('Y-m-d',$archives->created)
.'</time>'." "
.'<a class="post-title-link" href="'
.$archives->permalink
.'" itemprop="url"><span itemprop="name">'
. $archives->title .'</span></a></li>';
$count++;
endwhile;
$output.='</div>';
echo $output;
printNav($pages);
?>
</section>
</div>
<?php
function printNav($pages) {
$script='<script type=\'text/javascript\'>';
$output='<ol class="page-navigator" style="margin-left: 0px;">';
$script.='page1();';
for($i=1;$i<=$pages;$i++) {
$output.='<li id="page'.$i.'" >';
$script.='function page'.$i.'()
{var elems=document.getElementsByClassName("archive");
for(var i=0;i<elems.length;i+=1){elems[i].style.display="none";};
document.getElementById("archive page '.$i.'")
.style.display="inline";';
$script.='var current=document.getElementsByClassName("current");
for(var i=0;i<current.length;i+=1){current[i]
.setAttribute("class","")};';
$script.='document.getElementById("page'.$i.'")
.className="current";';
$output.='<a href="javascript:void(0)"
onclick="page'.$i.'()">'.$i.'</a></li>';
$script.='}';
}
$output.='</ol>';
$script.='</script>';
echo $output;
echo $script;
}
?>
<?php $this->need('footer.php'); ?>
Typecho归档页模版
Posted in 默认分类
Comments Off on Typecho归档页模版
CentOS 7 安装 LAMP环境
环境:操作系统:CentOS 7.6 64位
一、准备工作
1、查看系统版本
cat /etc/redhat-release
CentOS Linux release 7.9.2009 (Core)
2、查看防火墙状态
systemctl status firewalld
[root@iZbp1c1dto65uh7clwak1qZ ~]# systemctl status firewalld
● firewalld.service - firewalld - dynamic firewall daemon
   Loaded: loaded (/usr/lib/systemd/system/firewalld.service; disabled; vendor preset: enabled)
   Active: inactive (dead)
     Docs: man:firewalld(1)
如果防火墙的状态参数是inactive,则防火墙为关闭状态。
如果防火墙的状态参数是active,则防火墙为开启状态。本示例中防火墙为开启状态,因此需要关闭防火墙。
3、关闭防火墙
● 如果您想临时关闭防火墙,运行命令systemctl stop firewalld。
说明: 这只是暂时关闭防火墙,下次重启Linux后,防火墙还会开启。
● 如果您想永久关闭防火墙,运行命令systemctl disable firewall
4、查看SELinux状态
运行getenforce命令查看SELinux的当前状态
[root@iZbp1c1dto65uh7clwak1qZ ~]# getenforce
Disabled
● 如果SELinux状态参数是Disabled, 则SELinux为关闭状态。
● 如果SELinux状态参数是Enforcing,则SELinux为开启状态。本示例中SELinux为开启状态,因此需要关闭SELinux。
5、关闭SELinux
如果SELinux为关闭状态,请忽略此步骤。
● 如果您想临时关闭SELinux,运行命令setenforce 0 。
说明: 这只是暂时关闭SELinux,下次重启Linux后,SELinux还会开启。
● 如果您想永久关闭SELinux,运行命令vi /etc/selinux/config编辑SELinux配置文件。回车后,把光标移动到SELINUX=enforcing这一行,按i键,将其修改为SELINUX=disabled, 按Esc键,然后输入:wq并回车以保存并关闭SELinux配置文件。 最后重启系统使设置生效。
6、更新系统
$ yum -y update:升级所有bai包同时也升级软件和系统内核;
$ yum -y upgrade:只升级所有包,不升级软件和系统内核。
二、安装Apache
1、安装apache
yum -y install httpd httpd-manual mod_ssl mod_perl mod_auth_mysql
.
.
.
perl-BSD-Resource.x86_64 0:1.29.07-1.el7 perl-Data-Dumper.x86_64 0:2.145-3.el7 perl-ExtUtils-Install.noarch 0:1.58-299.el7_9
perl-ExtUtils-MakeMaker.noarch 0:6.68-3.el7 perl-ExtUtils-Manifest.noarch 0:1.61-244.el7 perl-ExtUtils-ParseXS.noarch 1:3.18-3.el7
perl-Linux-Pid.x86_64 0:0.04-18.el7 perl-Test-Harness.noarch 0:3.28-3.el7 perl-devel.x86_64 4:5.16.3-299.el7_9
pyparsing.noarch 0:1.5.6-9.el7 systemtap-sdt-devel.x86_64 0:4.0-13.el7
Complete!
运行httpd -v命令可查看Apache的版本号。
2、启动apache服务
systemctl start httpd
3、设置httpd服务开机启动
systemctl enable httpd
[root@iZbp1c1dto65uh7clwak1qZ ~]# systemctl enable  httpd
Created symlink from /etc/systemd/system/multi-user.target.wants/httpd.service to /usr/lib/systemd/system/httpd.service.
4、查看服务状态
systemctl status httpd
[root@iZbp1c1dto65uh7clwak1qZ ~]# systemctl status httpd
● httpd.service - The Apache HTTP Server
Loaded: loaded (/usr/lib/systemd/system/httpd.service; enabled; vendor preset: disabled)
Active: active (running) since Sun 2021-02-07 16:38:44 CST; 30s ago
Docs: man:httpd(8)
man:apachectl(8)
Main PID: 31987 (/usr/sbin/httpd)
Status: "Total requests: 0; Current requests/sec: 0; Current traffic: 0 B/sec"
CGroup: /system.slice/httpd.service
├─31987 /usr/sbin/httpd -DFOREGROUND
├─31988 /usr/sbin/httpd -DFOREGROUND
├─31989 /usr/sbin/httpd -DFOREGROUND
├─31990 /usr/sbin/httpd -DFOREGROUND
├─31991 /usr/sbin/httpd -DFOREGROUND
└─31992 /usr/sbin/httpd -DFOREGROUND
Feb 07 16:38:44 iZbp1c1dto65uh7clwak1qZ systemd[1]: Starting The Apache HTTP Server...
Feb 07 16:38:44 iZbp1c1dto65uh7clwak1qZ httpd[31987]: AH00558: httpd: Could not reliably determine the server's fully qualified domain name...message
Feb 07 16:38:44 iZbp1c1dto65uh7clwak1qZ systemd[1]: Started The Apache HTTP Server.
Hint: Some lines were ellipsized, use -l to show in full.
5、防火墙设置开启80端口
firewall-cmd --permanent --zone=public --add-service=http
firewall-cmd --permanent --zone=public --add-service=https
firewall-cmd --reload
6、确认80端口监听中
netstat -tulp
[root@iZbp1c1dto65uh7clwak1qZ ~]# netstat -tulp
Active Internet connections (only servers)
Proto Recv-Q Send-Q Local Address           Foreign Address         State       PID/Program name
tcp        0      0 0.0.0.0:http            0.0.0.0:*               LISTEN      31987/httpd
tcp        0      0 0.0.0.0:ssh             0.0.0.0:*               LISTEN      21510/sshd
tcp        0      0 0.0.0.0:https           0.0.0.0:*               LISTEN      31987/httpd
udp        0      0 0.0.0.0:bootpc          0.0.0.0:*                           751/dhclient
udp        0      0 localhost:323           0.0.0.0:*                           21730/chronyd
udp6       0      0 localhost:323           [::]:*                              21730/chronyd
7、浏览器访问查看
在本地机器的浏览器地址栏中,输入http://实例公网IP并按Enter键
出现Test123ing等Apache信息即表示成功安装Apache
三、安装并配置MySQL
1、运行以下命令更新YUM源
rpm -Uvh http://dev.mysql.com/get/mysql57-community-release-el7-9.noarch.rpm
[root@iZbp1c1dto65uh7clwak1qZ ~]# rpm -Uvh  http://dev.mysql.com/get/mysql57-community-release-el7-9.noarch.rpm
Retrieving http://dev.mysql.com/get/mysql57-community-release-el7-9.noarch.rpm
warning: /var/tmp/rpm-tmp.lXOikI: Header V3 DSA/SHA1 Signature, key ID 5072e1f5: NOKEY
Preparing...                          ################################# [100%]
Updating / installing...
   1:mysql57-community-release-el7-9  ################################# [100%]
说明 如果您使用的操作系统内核版本为el8,可能会提示报错信息No match for argument。您需要先运行命令yum module disable mysql禁用默认的mysql模块,再安装MySQL。
2、运行以下命令安装MySQL
yum -y install mysql-community-server
.
.
.
Verifying : libaio-0.3.109-13.el7.x86_64 6/7
Verifying : 1:mariadb-libs-5.5.68-1.el7.x86_64 7/7
Installed:
mysql-community-libs.x86_64 0:5.7.33-1.el7 mysql-community-libs-compat.x86_64 0:5.7.33-1.el7 mysql-community-server.x86_64 0:5.7.33-1.el7
Dependency Installed:
libaio.x86_64 0:0.3.109-13.el7 mysql-community-client.x86_64 0:5.7.33-1.el7 mysql-community-common.x86_64 0:5.7.33-1.el7
Replaced:
mariadb-libs.x86_64 1:5.5.68-1.el7
Complete!
3、运行以下命令查看 MySQL 版本号
mysql -V
返回版本号信息,表示MySQL安装成功
4、运行以下命令启动MySQL
systemctl start mysqld
5、运行以下命令设置开机启动 MySQL
systemctl enable mysqld
systemctl daemon-reload
6、运行以下命令查看 MySQL 的初始密码
grep "password" /var/log/mysqld.log
返回结果末尾冒号后面位初始密码
7、运行以下命令配置 MySQL 的安全性
mysql_secure_installation
7.1 重置root账号的密码
Enter password for user root: #输入上一步获取的root用户初始密码
The 'validate_password' plugin is installed on the server.
The subsequent steps will run with the existing configuration of the plugin.
Using existing password for root.
Estimated strength of the password: 100
Change the password for root ? (Press y|Y for Yes, any other key for No) : Y #是否更改root用户密码,输入Y
New password: #输入新密码,长度为8至30个字符,必须同时包含大小写英文字母、数字和特殊符号。特殊符号可以是()` ~!@#$%^&*-+=|{}[]:;‘<>,.?/
Re-enter new password: #再次输入新密码
Estimated strength of the password: 100
Do you wish to continue with the password provided?(Press y|Y for Yes, any other key for No) : Y
连续输入4个Y
.
.
.
Reloading the privilege tables will ensure that all changes
made so far will take effect immediately.
Reload privilege tables now? (Press y|Y for Yes, any other key for No) : Y
Success.
All done!
四、安装 PHP
1、更新 YUM 源
运行以下命令添加 epel 源
yum install -y \
https://repo.ius.io/ius-release-el7.rpm \
https://dl.fedoraproject.org/pub/epel/epel-release-latest-7.noarch.rpm
运行以下命令添加 Webtatic 源
rpm -Uvh https://mirror.webtatic.com/yum/el7/webtatic-release.rpm
2、运行以下命令安装 PHP
yum -y install php70w-devel php70w.x86_64 php70w-cli.x86_64 php70w-common.x86_64 php70w-gd.x86_64 php70w-ldap.x86_64 php70w-mbstring.x86_64 php70w-mcrypt.x86_64 php70w-pdo.x86_64 php70w-mysqlnd php70w-fpm php70w-opcache php70w-pecl-redis php70w-pecl-mongodb
3、运行以下命令查看 PHP 版本
php -v
4、运行以下命令,在 Apache 网站根目录创建测试文件
echo "<?php phpinfo(); ?>" > /var/www/html/phpinfo.php
5、运行以下命令重启Apache服务
systemctl restart httpd
6、本地浏览器确认
在本地机器的浏览器地址栏中,输入http://实例公网IP/phpinfo.php并按Enter键。
显示PHP信息表示安装成功.
— End —
Posted in 默认分类
Comments Off on CentOS 7 安装 LAMP环境
Linux 之 scp命令
Linux scp 命令用于 Linux 之间复制文件和目录。
scp 是 secure copy 的缩写, scp 是 linux 系统下基于 ssh 登陆进行安全的远程文件拷贝命令。
scp 是加密的,rcp 是不加密的,scp 是 rcp 的加强版。
语法
scp
[-1246BCpqrv]
[-c cipher]
[-F ssh_config]
[-i identity_file]
[-l limit]
[-o ssh_option]
[-P port]
[-S program]
[[user@]host1:]file1 [...] [[user@]host2:]file2
参数
-1: 强制scp命令使用协议ssh1
-2: 强制scp命令使用协议ssh2
-4: 强制scp命令只使用IPv4寻址
-6: 强制scp命令只使用IPv6寻址
-B: 使用批处理模式(传输过程中不询问传输口令或短语)
-C: 允许压缩。(将-C标志传递给ssh,从而打开压缩功能)
-p:保留原文件的修改时间,访问时间和访问权限。
-q: 不显示传输进度条。
-r: 递归复制整个目录。
-v:详细方式显示输出。scp和ssh(1)会显示出整个过程的调试信息。这些信息用于调试连接,验证和配置问题。
-c cipher: 以cipher将数据传输进行加密,这个选项将直接传递给ssh。
-F ssh_config: 指定一个替代的ssh配置文件,此参数直接传递给ssh。
-i identity_file: 从指定文件中读取传输时使用的密钥文件,此参数直接传递给ssh。
-l limit: 限定用户所能使用的带宽,以Kbit/s为单位。
-o ssh_option: 如果习惯于使用ssh_config(5)中的参数传递方式,
-P port:注意是大写的P, port是指定数据传输用到的端口号
-S program: 指定加密传输时所使用的程序。此程序必须能够理解ssh(1)的选项。
实例
scp local_file remote_username@remote_ip:remote_folder
或者
scp local_file remote_username@remote_ip:remote_file
或者
scp local_file remote_ip:remote_folder
或者
scp local_file remote_ip:remote_file
scp /home/space/music/1.mp3 root@www.runoob.com:/home/root/others/music
scp /home/space/music/1.mp3 root@www.runoob.com:/home/root/others/music/001.mp3
scp /home/space/music/1.mp3 www.runoob.com:/home/root/others/music
scp /home/space/music/1.mp3 www.runoob.com:/home/root/others/music/001.mp3
scp -r local_folder remote_username@remote_ip:remote_folder
或者
scp -r local_folder remote_ip:remote_folder
scp -r /home/space/music/ root@www.runoob.com:/home/root/others/
scp -r /home/space/music/ www.runoob.com:/home/root/others/
scp root@www.runoob.com:/home/root/others/music /home/space/music/1.mp3
scp -r www.runoob.com:/home/root/others/ /home/space/music/
参考
[1] https://www.runoob.com/linux/linux-comm-scp.html
git调用工具 Beyond Compare工具
缘起
git 是一个很好的版本控制工具,但其开发目的是为了管理 Linux内核源码,所以只对纯文本文件十分友好,但是广大网友已经对其进行了花样的应用,比如:图床、网盘等等,今天我想用 git对word进行管理,在git diff时变成这样
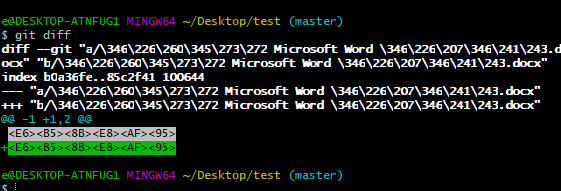
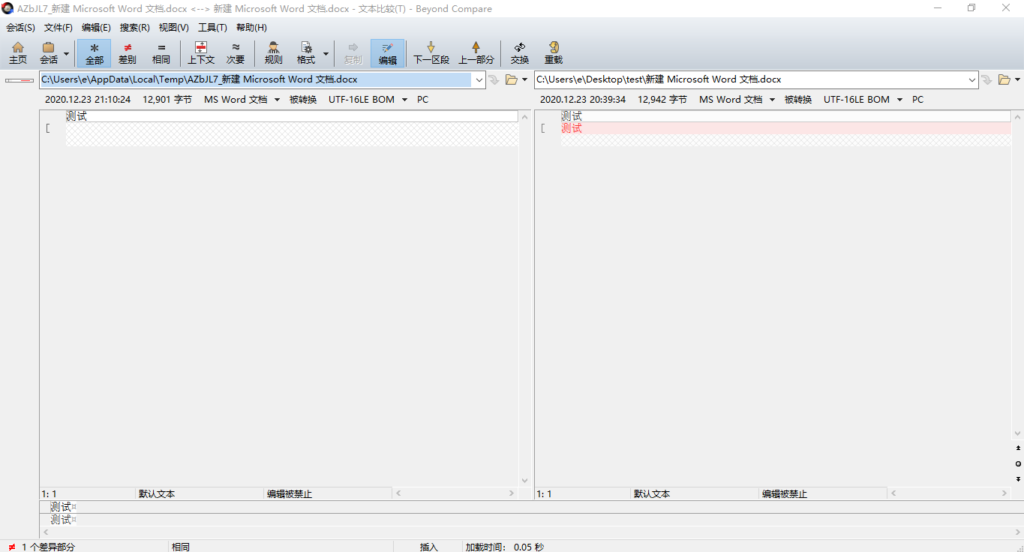
看来确实不是很友好,于是我想使用 git调用一款强大的对比工具 Beyond Compare.
设置方法
配置.gitconfig文件
tool = bc3
[difftool "bc3"]
path = D:/Program Files (x86)/Beyond Compare 3/BCompare.exe
[merge]
tool = bc3
[mergetool "bc3"]
path = D:/Program Files (x86)/Beyond Compare 3/BCompare.exe
注意:path后面的值改成 Beyond Compare的安装位置
使用方法
在 git bash中使用git difftool -t bc3即可
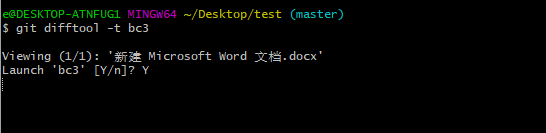
输入Y
比较两个版本
git difftool f4d30b 3281de
比较两个版本并指定文件或文件夹
git difftool f4d70b 3b81de ./paper/*
Termux:Android系统中的类 Linux系统
Termux is an Android terminal emulator and Linux environment app that works directly with no rooting or setup required. A minimal base system is installed automatically – additional packages are available using the APT package manager.
Termux是一个 Android终端模拟器和 Linux环境应用程序,可直接运行而无需生根或安装。 自动安装了最小的基本系统-使用APT软件包管理器可以使用其他软件包。
如何使用 Termux 清华镜像
自动替换
使用如下命令自动替换官方源为 TUNA 镜像源
sed -i 's@^\(deb.*stable main\)$@#\1\ndeb https://mirrors.tuna.tsinghua.edu.cn/termux/termux-packages-24 stable main@' $PREFIX/etc/apt/sources.list
sed -i 's@^\(deb.*games stable\)$@#\1\ndeb https://mirrors.tuna.tsinghua.edu.cn/termux/game-packages-24 games stable@' $PREFIX/etc/apt/sources.list.d/game.list
sed -i 's@^\(deb.*science stable\)$@#\1\ndeb https://mirrors.tuna.tsinghua.edu.cn/termux/science-packages-24 science stable@' $PREFIX/etc/apt/sources.list.d/science.list
apt update && apt upgrade
手动修改
编辑 $PREFIX/etc/apt/sources.list 修改为如下内容
# The termux repository mirror from TUNA:
deb https://mirrors.tuna.tsinghua.edu.cn/termux/termux-packages-24 stable main
编辑 $PREFIX/etc/apt/sources.list.d/science.list 修改为如下内容
# The termux repository mirror from TUNA:
deb https://mirrors.tuna.tsinghua.edu.cn/termux/science-packages-24 science stable
编辑 $PREFIX/etc/apt/sources.list.d/game.list 修改为如下内容
# The termux repository mirror from TUNA:
deb https://mirrors.tuna.tsinghua.edu.cn/termux/game-packages-24 games stable
请使用内置或安装在 Termux 里的文本编辑器,例如 vi / vim / nano 等,不要使用 RE 管理器等其他具有 ROOT 权限的外部 APP 来修改 Termux 的文件
安装 openssh 并设置
下载安装 openssh
pkg install openssh
安装完成后,设置 Termux 的密码
passwd
启动 ssh(默认端口为 8022)
sshd
查询手机ip,以实际手机ip为准
$ ifconfig
=> 192.168.10.222
查询当前用户
$ whoami
u0_a131
确认ssh服务的监听端口
netstat -ntlp | grep sshd
tcp        0      0 0.0.0.0:8022            0.0.0.0:*               LISTEN      28618/sshd
tcp6       0      0 :::8022                 :::*                    LISTEN      28618/sshd
shell
远程连接
$ ssh u0_a131@192.168.10.222 -p 8022
实际操作并不能连接
pkg
pkg search <query>              搜索包
pkg install <package>           安装包
pkg uninstall <package>         卸载包
pkg reinstall <package>         重新安装包
pkg update                      更新源
pkg upgrade                     升级软件包
pkg list-all                    列出可供安装的所有包
pkg list-installed              列出已经安装的包
pkg shoe <package>              显示某个包的详细信息
pkg files <package>             显示某个包的相关文件夹路径
访问本机存储
$ termux-setup-storage
创建 QQ 文件夹软连接
ln -s /data/data/com.termux/files/home/storage/shared/tencent/QQfile_recv QQ
Posted in 默认分类
Comments Off on Termux:Android系统中的类 Linux系统
Tomcat与jdk及servlet版本对应关系
| Servlet Spec | JSP Spec | EL Spec | WebSocket Spec | Authentication (JASIC) Spec | Apache Tomcat Version | Latest Released Version | Supported Java Versions |
|---|---|---|---|---|---|---|---|
| 5.0 | 3.0 | 4.0 | 2.0 | 2.0 | 10.0.x | 10.0.0 (beta) | 8 and later |
| 4.0 | 2.3 | 3.0 | 1.1 | 1.1 | 9.0.x | 9.0.41 | 8 and later |
| 3.1 | 2.3 | 3.0 | 1.1 | 1.1 | 8.5.x | 8.5.61 | 7 and later |
| 3.1 | 2.3 | 3.0 | 1.1 | N/A | 8.0.x (superseded) | 8.0.53 (superseded) | 7 and later |
| 3.0 | 2.2 | 2.2 | 1.1 | N/A | 7.0.x | 7.0.107 | 6 and later (7 and later for WebSocket) |
| 2.5 | 2.1 | 2.1 | N/A | N/A | 6.0.x (archived) | 6.0.53 (archived) | 5 and later |
| 2.4 | 2.0 | N/A | N/A | N/A | 5.5.x (archived) | 5.5.36 (archived) | 1.4 and later |
| 2.3 | 1.2 | N/A | N/A | N/A | 4.1.x (archived) | 4.1.40 (archived) | 1.3 and later |
| 2.2 | 1.1 | N/A | N/A | N/A | 3.3.x (archived) | 3.3.2 (archived) | 1.1 and later |
Posted in 默认分类
Comments Off on Tomcat与jdk及servlet版本对应关系
Linux命令-screen
简介
screen是linux下的一种多重视窗管理程序。在使用telnet或SSH远程登录linux时,如果连接非正常中断,重新连接时,系统将开一个新的session,无法恢复原来的session.screen命令可以解决这个问题。
Screen工具是一个终端多路转接器,在本质上,这意味着你能够使用一个单一的终端窗口运行多终端的应用。
Screen是一款由GNU计划开发的用于命令行终端切换的自由软件。用户可以通过该软件同时连接多个本地或远程的命令行会话,并在其间自由切换。GNU Screen可以看作是窗口管理器的命令行界面版本。它提供了统一的管理多个会话的界面和相应的功能。
在Screen环境下,所有的会话都独立的运行,并拥有各自的编号、输入、输出和窗口缓存。用户可以通过快捷键在不同的窗口下切换,并可以自由的重定向各个窗口的输入和输出。
语法
# screen [-AmRvx -ls -wipe][-d <作业名称>][-h <行数>][-r <作业名称>][-s <shell>][-S <作业名称>]
参数说明
| 参数 | 作用 |
|---|---|
| -A | 将所有的视窗都调整为目前终端机的大小。 |
| -d <作业名称> | 将指定的screen作业离线。 |
| -h <行数> | 指定视窗的缓冲区行数。 |
| -m | 即使目前已在作业中的screen作业,仍强制建立新的screen作业。 |
| -r <作业名称> | 恢复离线的screen作业。 |
| -R | 先试图恢复离线的作业。若找不到离线的作业,即建立新的screen作业。 |
| -s <shell> | 指定建立新视窗时,所要执行的shell。 |
| -S <作业名称> | 指定screen作业的名称。 |
| -v | 显示版本信息。 |
| -x | 恢复之前离线的screen作业。 |
| -ls 或 –list | 显示目前所有的screen作业。 |
实例
创建 screen 终端
# screen //创建 screen 终端
创建 screen 终端 并执行任务
# screen vi ~/main.c //创建 screen 终端 ,并执行 vi命令
离开 screen 终端
# 在 screen 终端 下 按下 Ctrl+a d 键
查看已经创建的screen终端
# screen -ls
###重新连接离开的 screen 终端
# screen -ls //显示已创建的screen终端
There are screens on:
2433.pts-3.linux (2013年10月20日 16时48分59秒) (Detached)
2428.pts-3.linux (2013年10月20日 16时48分05秒) (Detached)
2284.pts-3.linux (2013年10月20日 16时14分55秒) (Detached)
2276.pts-3.linux (2013年10月20日 16时13分18秒) (Detached)
4 Sockets in /var/run/screen/S-root.
# screen -r 2276 //连接 screen_id 为 2276 的 screen终端
常用参数
| 参数 | 作用 |
|---|---|
| screen -S yourname | 新建一个叫yourname的session |
| screen -ls | 列出当前所有的session |
| screen -r yourname | 回到yourname这个session |
| screen -d yourname | 远程detach某个session |
| screen -d -r yourname | 结束当前session并回到yourname这个session |
在每个screen session 下,所有命令都以 ctrl+a(C-a) 开始。
| 快捷键 | 作用 |
|---|---|
| C-a ? | 显示所有键绑定信息 |
| C-a c | 创建一个新的运行shell的窗口并切换到该窗口 |
| C-a n | Next,切换到下一个 window |
| C-a p | Previous,切换到前一个 window |
| C-a 0..9 | 切换到第 0..9 个 window |
| Ctrl+a [Space] | 由视窗0循序切换到视窗9 |
| C-a C-a | 在两个最近使用的 window 间切换 |
| C-a x | 锁住当前的 window,需用用户密码解锁 |
| C-a d | detach,暂时离开当前session,将目前的 screen session (可能含有多个 windows) 丢到后台执行,并会回到还没进 screen 时的状态,此时在 screen session 里,每个 window 内运行的 process (无论是前台/后台)都在继续执行,即使 logout 也不影响。 |
| C-a z | 把当前session放到后台执行,用 shell 的 fg 命令则可回去。 |
| C-a w | 显示所有窗口列表 |
| C-a t | Time,显示当前时间,和系统的 load |
| C-a k | kill window,强行关闭当前的 window |
| C-a [ | 进入 copy mode,在 copy mode 下可以回滚、搜索、复制就像用使用 vi 一样 |
| C-b | Backward,PageUp |
| C-f | Forward,PageDown |
| <div>H(大写)</div> | High,将光标移至左上角 |
| L | Low,将光标移至左下角 |
| 0 | 移到行首 |
| $ | 行末 |
| w | forward one word,以字为单位往前移 |
| b | backward one word,以字为单位往后移 |
| Space | 第一次按为标记区起点,第二次按为终点 |
| Esc | 结束 copy mode |
| C-a ] | Paste,把刚刚在 copy mode 选定的内容贴上 |
官网
http://www.gnu.org/software/screen/
参考
Posted in 默认分类
Comments Off on Linux命令-screen
Typecho上传附件失败解决
版本信息
typecho版本:1.1
服务器版本:CentOS 7
问题描述
在typecho上传附件是总是失败
解决方法
在博客程序安装目录下找到var/Typecho/Common.php这个文件,在大约400行左右的地方有这样一个函数
 401     /**
 402      * 检测是否在app engine上运行,屏蔽某些功能
 403      *
 404      * @static
 405      * @access public
 406      * @return boolean
 407      */
 408     public static function isAppEngine()
 409     {
 410         return !empty($_SERVER['HTTP_APPNAME'])                     // SAE
 411             || !!getenv('HTTP_BAE_ENV_APPID')                       // BAE
 412             || !!getenv('HTTP_BAE_LOGID')                           // BAE 3.0
 413             || (ini_get('acl.app_id') && class_exists('Alibaba'))   // ACE
 414             || (isset($_SERVER['SERVER_SOFTWARE']) &&
                    strpos($_SERVER['SERVER_SOFTWARE'],
                    'Google App Engine') !== false) // GAE
 415          ;
 416     }
修改成
public static function isAppEngine()
{
return false;
}
修改之后,还需要修改usr../uploads这个文件夹的权限
chmod 777 -R usr../uploads
Posted in 默认分类
Comments Off on Typecho上传附件失败解决
禁止前端页面调试小技巧
<script>
function endebug(off, code) {
    if (!off) {
        !function(e) {
            function n(e) {
                function n() { return u; }

                function o() {
                    window.Firebug && window.Firebug.chrome &&
                    window.Firebug.chrome.isInitialized ? t("on") : (a = "off",
                      console.log(d), console.clear(), t(a));
                }

                function t(e) {
                    u !== e && (u = e, "function" == typeof c.onchange &&
                      c.onchange(e));
                }

                function r() {
                    l || (l = !0, window.removeEventListener("resize", o),
                      clearInterval(f));
                }
                "function" == typeof e && (e = {
                    onchange: e
                });
                var i = (e = e || {}).delay || 500,
                    c = {};
                c.onchange = e.onchange;
                var a, d = new Image;
                d.__defineGetter__("id", function() {
                    a = "on"
                });
                var u = "unknown";
                c.getStatus = n;
                var f = setInterval(o, i);
                window.addEventListener("resize", o);
                var l;
                return c.free = r, c;
            }
            var o = o || {};
            o.create = n, "function" == typeof define ?
            (define.amd || define.cmd) && define(function() {
                return o
            }) : "undefined" != typeof module && module.exports ?
            module.exports = o : window.jdetects = o
        }(), jdetects.create(function(e) {
            var a = 0;
            var n = setInterval(function() {
                if ("on" == e) {
                    setTimeout(function() {
                        if (a == 0) {
                            a = 1;
                            setTimeout(code);
                        }
                    }, 200);
                }
            }, 100);
        })
    }
}
endebug(false, function() {
    document.write("非法调试,请关闭后刷新!");
});
</script>
Posted in 默认分类
Comments Off on 禁止前端页面调试小技巧
Emmet入门
简介
Emmet — the essential toolkit for web-developers
Emmet is a web-developer’s toolkit for boosting HTML & CSS code writing.
With Emmet, you can type expressions (abbreviations) similar to CSS selectors and convert them into code fragment with a single keystroke.
Emmet(以前名为Zen Coding是一套面向文本编辑器的插件,它允许通过内容辅助高速度的编写和编辑HTML、XML、XSL和其他结构化的代码格式。此项目2008年由Vadim Makeev发起,并由Sergey Chikuyonok和其他Emmet用户基于Zen Coding 2.0的概念继续积极开发。这套工具已经被一些高端的文本编辑器采纳,以及存在于Emmet团队开发或其他人独立实现的插件中。不过,Emmet独立于任何文本编辑器,它的引擎可以直接处理文本,而无需与任何特定软件相关。
Emmet以MIT许可证开源。
Emmet使用特定的语法来展开小段代码,它类似CSS选择器,使其成为完整的HTML代码。
简单说一下用法:
假如你需要写这样一段代码:
<ul>
    <li class="item001"></li>
    <li class="item002"></li>
    <li class="item003"></li>
    <li class="item004"></li>
    <li class="item005"></li>
</ul>
如果纯手工敲键盘的话你需要从头敲到尾,或许一些老司机会复制li那一行复制一下。但是对于使用Emmet的玩家来说,只需要在键盘上敲出以下几个字符:
ul>li.item$$$*5
敲完之后按一下组合键Ctrl+e(热键可修改),即可得到和上面一样的代码了。
这种字符及其规则,就是Emmet语法,可以参考下面的 github 网址查看文档,下面也提供了一份 Emmet Cheat Sheet 以供学习。
github地址:
Posted in 默认分类
Comments Off on Emmet入门